Voting machine using Arduino

Electronic voting machine has now replaced the traditional mechanism of ballot voting due to several advantages like security, automatic counting etc. The system consists of two units – the control unit and the user unit. The control unit consists of some control switches and status LED’s, and is handled by the presiding officer. The user unit provides voting facility and contains a matrix keypad, a memory IC and an LCD display. The system operates in three modes – the Idle mode, Voting mode and Counting mode. Each mode is identified by a status byte written in the EEPROM. In Ideal mode the machine is idle, that means the machine is ready to use. When the presiding officer press the START button , machine waits for the proceed instruction then it enters in to voting mode where the user can select a candidate and cast a supporting or opposing vote. This process repeats until the counting mode is activated by the presiding officer. The status byte act as a memory lock, and thus prevents any malpractices. In counting mode the vote obtained for each candidate is displayed on LCD module. After that the presiding officer can erase the vote or preserve the current status.


We all are quite familiar with voting machines, even we have covered few other electronic voting machine projects previously aan using RFID and AVR microcontroller. In this project, we have used the arduino controller to create an electronic voting machine
Electronic voting machine has now replaced the traditional mechanism of ballot voting due to several advantages like security, automatic counting etc. The system consists of two units – the control unit and the user unit. The control unit consists of some control switches and status LED’s, and is handled by the presiding officer. The user unit provides voting facility and contains a matrix keypad, a memory IC and an LCD display. The system operates in three modes – the Idle mode, Voting mode and Counting mode. Each mode is identified by a status byte written in the EEPROM. In Ideal mode the machine is idle, that means the machine is ready to use. When the presiding officer press the START button , machine waits for the proceed instruction then it enters in to voting mode where the user can select a candidate and cast a supporting or opposing vote. This process repeats until the counting mode is activated by the presiding officer. The status byte act as a memory lock, and thus prevents any malpractices. In counting mode the vote obtained for each candidate is displayed on LCD module. After that the presiding officer can erase the vote or preserve the current status.
Components
- Arduino Uno
- 16x2 LCD
- Push button
- Bread board
- Power
- Connecting wires
Circuit Diagram and Working Explanation
In this project we have used four push buttons for four different candidates. We can increase the number of candidate but for better understanding we have limited it to four. When any voter press any of four button then respecting voting value will increment by one each time. After whole voting we will press result button to see the results. As the "result" button is pressed, arduino calculates the total votes of each candidate and show it on LCD display
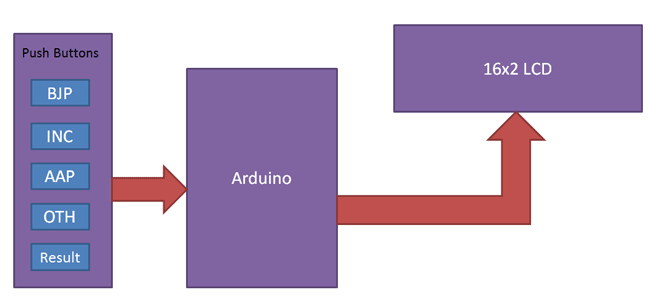
Circuit of this project is quite easy which contains Arduino, push buttons and LCD. Arduino controls the complete processes like reading button, incrementing vote value, generating result and sending vote and result to LCD. Here we have added five buttons in which first button is for BJP, second for INC, third is for AAP, forth is for OTH means others and last button is used for calculating or displaying results.

The five push buttons are directly connected with pin 15-19(A1-A5) of Arduino with respect to ground. A 16x2 LCD is connected with arduino in 4-bit mode. Control pin RS, RW and En are directly connected to arduino pin 12, GND and 11. And data pin D4-D7 is connected to pins 5, 4, 3 and 2 of arduino.
Comments
SEO training in velachery
SEO training in anna nagar
SEO course in chennai
SEO training in porur
SEO training in tambaram
CCNA course in chennai
CCNA training in chennai
CCNA training in anna nagar
CCNA training in porur
Python Training in Chennai
CCNA training in T Nagar
CCNA classes in tambaram
CCNA training in Omr
Python Training in Velachery
German Classes in Chennai
German Language Course in Chennai
German Language Classes in Chennai
German Courses in Chennai
German classes in Anna Nagar
German classes in Velachery
German classes in Tambaram
German classes in Adyar
Java Training in Chennai
Java Course in Chennai
Java Training in Anna Nagar
Java Training in Velachery
Java Training in Tambaram
Python Training in Chennai
Python Training in Anna nagar
Python Training in OMR
Post a Comment